
Borg Benefits
- Easy installation
- Deduplication – saving only changed files instead of storing another backup copy
- Incriminating copying and support of the Zstandard compression algorithm
- Easy data recovery.
- Flexible cleanup of old backups
Installing the Borg server
Borg is present in almost all repositories of most current Linux distributions. All you have to do is install the borgbackup package.
As a Borg server you can use our Data Storage service and get disk space of 100GB to 10TB for your files and backups. If you use Data Storage or any other service that supports borg you can skip the server setup and move on to the client setup.
sudo apt install borgbackupAfter installing Borg Backup, we need to create a new user, under this user we will connect to the server to download the backups. In order to avoid confusion I will create a new user with the name borg, you can use any name you want for the new user.
sudo useradd -m borgThis will create the user borg and its home directory will be in /home/
If you want the user’s home directory to be in a different location, run the following command
sudo useradd -m -d /opt/username usernameTo increase security we will use ssh key authentication and for this we will create the necessary directory and file in the user’s home directory.
Logging in as a created user
sudo -i -u borgCreate an .ssh directory and an authorized_keys file in it. After configuring the client, we will add to the authorized_keys file the ssh key that we will generate on the client side.
mkdir .ssh
touch .ssh/authorized_keys
This completes the server setup and you can move on to the client setup.
Configuring the Borg client
Setting up the client is pretty much the same as setting up the server. Just like on the server, we need to install the package borgbackup
sudo apt install borgbackupWe will use an ssh key to connect to the borg server. We made a separate video about how to generate an ssh key and how to connect to the server using an ssh key.
In this example, we will generate the ssh key for the root user since it is from this user that we will upload files to the borg server.
If you have previously created an ssh key for a user, you should use that key and skip creating a new one.
Execute the command
ssh-keygen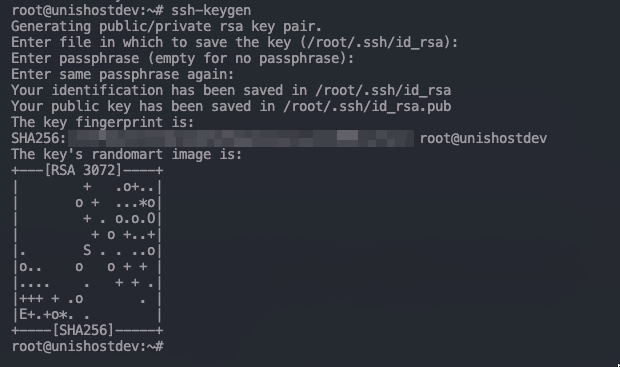
When the command is finished, two files /root/.ssh/id_rsa and /root/.ssh/id_rsa.pub will be created – a private key file id_rsa and a public key file id_rsa.pub.
View the contents of the public key and copy it
cat /root/.ssh/id_rsa.pub
Copy the key and connect to the borg server that we configured.
Logging in as borg
sudo -i -u borgOpen in the editor the authorized_keys file that we created earlier and insert our public key into it.
This completes the preparation of the server and client side and we can start building the repository.
To create a new repository, a place where files will be stored that will be uploaded to the server, run the following command
borg init -e none [email protected]:bkp-e none – indicates that we are not using encryption
[email protected] – You need to replace it with the username you created and the IP of your server
bkp – your repository name
After executing the command, a directory named bkp will be created on the server side and it will contain the necessary files for borg backup to work correctly.
Borg Backup example
To create a backup using Borg, run the following command:
borg create --list -C zstd [email protected]:bkp::devsrv-`date +%Y%m%d_%H%M%S` /home/gitLet’s take a closer look at the command listed above.
create – tells borg to back it up
–list – optional parameter, displays the status of the command execution
-C zstd – specifies the compression algorithm
[email protected] – user name and ip address of the borg server
bkp – the name of the repository that is being backed up
devsrv-`date +%Y%m%d_%H%M%S` – will add to the archive name the current date and time and an arbitrary name, in our example it is devsrv
/home/git – directory for which the backup will be performed
After the command is executed, a backup of the current directory will be created on the server.
Using Borg Backup
Repository information
To get information about the repository, we need to run the command borg info and specify the server and the repository we need to get information about
borg info [email protected]:bkp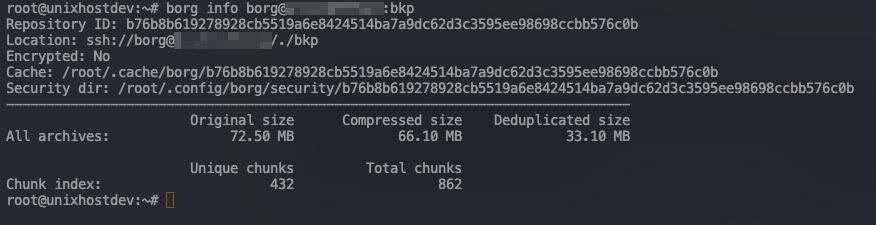
In response, we get the size of the repository occupied.
Getting a list of backups
To display all available backups, run borg list
borg list [email protected]:bkp
In response to this command you will get a list of all backups.
To obtain information on a particular archive, you must specify the name of the archive for which you want to obtain information.
borg list [email protected]:bkp::file_nameIn response you will get a list of all files that are in the archive
Statistics on the specific Borg archive
To get detailed statistics on the archive you are interested in, you need to run borg info with the name of the archive
borg info [email protected]:bkp::devsrv-20230118_104604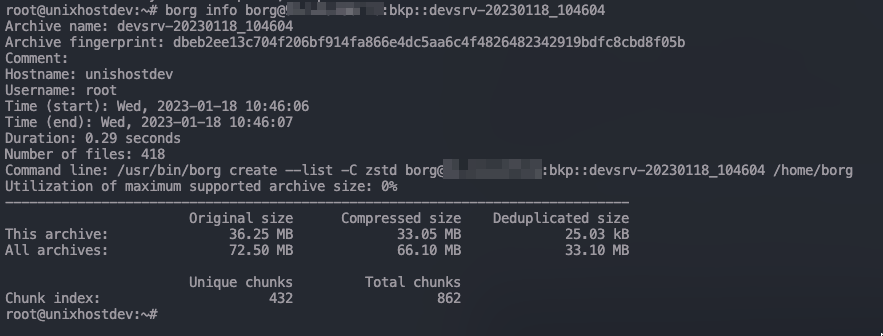
In this output you will get detailed statistics about this archive.
Checking the repository/archive in Borg
Borg implements a system to check the integrity of a repository or individual archives. To check the repository, run the command borg check -v and specify the server and repository name.
borg check -v [email protected]:bkp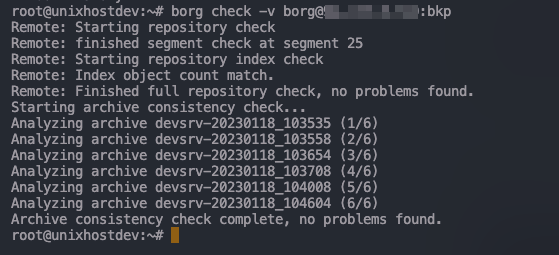
To check the separately selected archive, additionally specify the name of the archive that you want to check.
borg check -v [email protected]:bkp::devsrv-20230118_104604
Cleaning up old backups in Borg Backup
To optimize disk space on the borg server, you can automatically purge old backups. To remove unneeded backups, you need to run the borg prune command and specify the backup storage rule. The following keys can be used in borg prune:
- –keep-within INTERVAL – store all archives for a specified period of time
- –keep-last, –keep-secondly – store the specified number of the last copies.
- –keep-minutely – the number of copies in the last hour.
- -H, –keep-hourly – the number of last hour copies.
- -d, –keep-daily – the number of last daily copies.
- -w, –keep-weekly – the number of the last weekly copies.
- -m, –keep-monthly – the number of last monthly copies.
- -y, –keep-yearly – the number of most recent annual copies.
Important: If there are several backups in the specified period, only the most recent one will be saved.
The –dry-run option is used to evaluate the result of the deletion. If you use it, there will be no deletion, you can evaluate the result of the command and if you are satisfied with it, run the command without the option.
borg prune --list --keep-last 2 --dry-run [email protected]:bkp

As you can see in the screenshot above, only two backups will remain and the rest will be deleted. Now, to remove the extra backups, run the command again, but without –dry-run
Warning! If you back up different directories in the same repository, for example with different archive names, then borg doesn’t take the archive name into account when cleaning up old backups, then you will only have the latest copies, regardless of the archive name prefix.
Mounting a Borg backup
If you need to restore files from a backup, you do not need to download the full archive, unzip it, and then restore. It is enough to mount the actual backup to the server and restore the necessary data. You can also mount the entire repository and copy the necessary backup from it.
To mount the repository, run the command borg mount specifying the repository you want to mount and the mount point.
borg mount [email protected]:bkp /mnt/bkp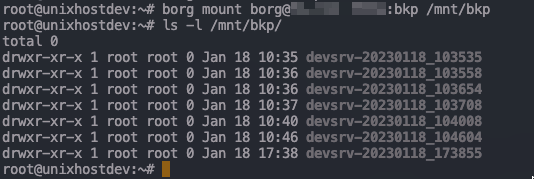
Example of mounting a specific archive
borg mount [email protected]:bkp::devsrv-20230118_173855 /mnt/devsrv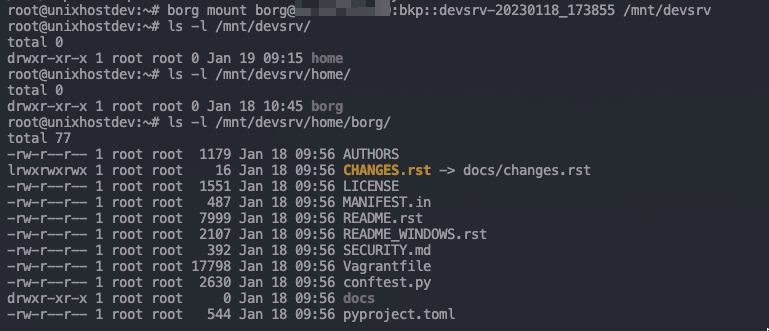
To unmount a mounted repository or archive, run the command borg umount and specify the mount point
borg umount /mnt/bkpAutomating backups with Borg Backup
We will use crontab to automate the creation of Borg backups, but before we create a rule we will need to create a simple script which will run at the time we want and do, for example, not only backup but also delete old backups.
Create a borgbkp.sh file in the home directory and put in it the backup command we saw above and add a command that will delete the old backups and keep the last 5 backups.
#!/bin/sh

borg create --list -C zstd [email protected]:bkp::devsrv-`date +%Y%m%d_%H%M%S` /home/git
borg prune --list --keep-last 5 [email protected]:bkp
Save the file, and set permissions for this file to run
chmod +x /home/borgbkp.shOpen the file /etc/crontab and add to it the timer that will execute our script. You can create the necessary interval of script execution with the help of the online service crontab.guru. In the example below our script will be executed every day at 3 am.
0 3 * * * root /home/borgbkp.sh